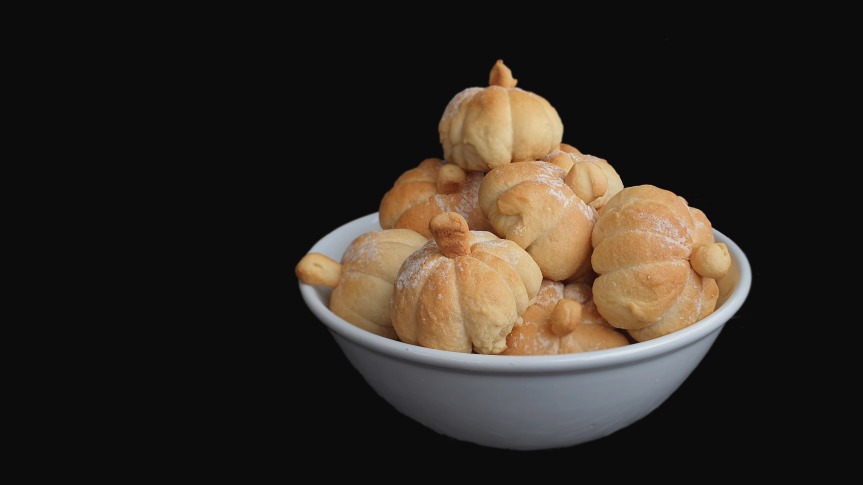
Pumpkin-shaped Dinner Rolls

Cuuuuuuuuuuuute.

bread-rising-pumpkin

Do you want to make Thanksgiving prep even more stressful and time-consuming? Boy do I have the recipe for you.

20191116_200609 copy

I kinda do think the cuteness factor makes it all worth it though. And it’ll make your family (or in my case friends since I made if for Friendsgiving) suuuuper impressed.

20191116_215752 copy

Bondage buns.

bread-rising-pumpkin-2

I tried making something similar before but I’ve now learnt the secret of oiled string, which makes untying the bread a breeze.

20191117_114458 copy

The little stems are also made of bread, and have kind of a crouton-like structure. Alternatively you could use pecans as stems, but I think the bread stem is kind of cuter.

pumpkin shaped bread rolls

I got the recipe from the Old Faithful foodwishes.

Ingredients (makes 12)

  • 1 cup milk (about body temperature)
  • 7g (1 packet) instant yeast
  • 1.5 tbsp honey
  • 56g (4 tbsp) butter
  • 375g (3 cups) flour
  • 1 tsp salt
  • Some oil (to oil the dough and string)

Method

  1. Mix all the ingredients together and knead dough until smooth and elastic.
  2. Oil the dough, cover (either with a damp cloth or with oiled clingfilm), and let rise until doubled in size.
  3. Meanwhile, cut out 4 strings per bun (about 8-10 inches long), and mix with 1 tbsp of oil until all the strings are well-oiled.
  4. When the dough has risen in size, knock down the dough. Set aside some dough to make the stems. Then divide the remaining dough into 12 pieces  (if like me you can’t do this by eye, weigh the dough and then divide the dough into 12 by weight).
  5. Shape each dough piece into a ball, and cover and let rise for 15 mins or until slightly puffy looking.
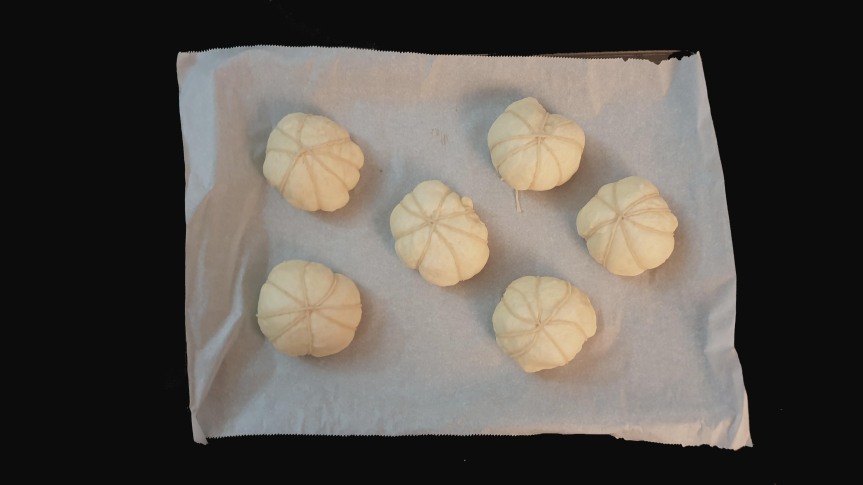
  6. Lay 4 pieces of string over each other, intersecting at one point (see the original recipe video). Then lay a dough piece smooth side down, centered over the intersection of the strings. Tie each string snugly against the bread (but not squeezing the bread), such that the bread is now divided into 8 sections by the string. The more precise the intersection of strings, the nicer the bread will look.
  7. Cover and let rise for 30 mins, or until the dough has risen enough to bulge out slightly between the strings. Meanwhile preheat the oven to 375°F/190°C.
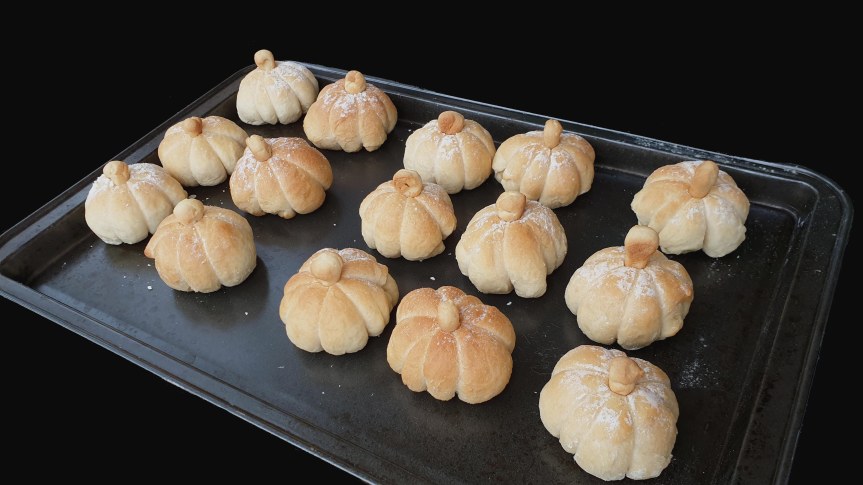
  8. When the dough has risen enough, give a light dusting of flour over the buns for a ~rustic look~. Then bake in the preheated oven for about 18-23 mins (mine took closer to 18), or until golden.
  9. Let cool slightly at room temperature for about 15 mins before cutting the strings.
  10. While the bread is cooling, shape stems from the dough set aside earlier into roughly a triangular shape.
  11. Bake the stems in the oven for about 15 mins. Basically just don’t let it burn. Let stems cool until cool enough to handle.
  12. When you’ve removed the strings from the bread, use a small knife to make a small incision at the top of the bun. Put the stem in pointy side in.

Notes

  • All timings listed are a general guide. It’s better to follow the description (eg doubled in size) rather than the timings, as the timing depends on many factors like the activity of your yeast, or the surrounding temperature.
  • If you’re using active dry yeast instead of instant yeast, you might have to activate the yeast first. Warm up the water that was supposed to go into the bread till it’s about body temperature, and then add the yeast into the water. When the mixture is foamy (about 5-10 mins later), the yeast is ready to be used.
  • Make sure you cover all dough with a damp cloth when you’ve not actively working with the dough to make sure the dough doesn’t dry out. This is especially since this recipe involves a lot of shaping so the dough is a lot more likely to dry out while you’re shaping all the buns.


Giant Levain-style Chocolate Chip and Walnut Cookies

What an absolute unit.

giant-chocolate-chip-cookie

This recipe is based off New York City’s famous Levain bakery‘s chocolate chip cookie.

20191019_232810 copy

Look at the size of each chip! I used Ghirardelli’s Semi-Sweet Chocolate Grand Chips, which are about double the size of a standard chip. Which means MORE CHOCOLATE PER BITE.

20191020_151748 copy

The size of the chocolate also contributes significantly to each chonk of a cookie.

20191020_192013 copy

These cookies are beautifully crispy on the edges, but remain soft and gooey in the center.

giant chocolate chip cookie levain style

This recipe was based off this recipe, which was in turn based off this recipe.

Ingredients (makes 8 large cookies)

  • 2 sticks unsalted butter, softened (227g)
  • 3/4 cup light brown sugar (150g)
  • 1/2 cup granulated sugar (100g)
  • 2 large eggs
  • 1 cup cake flour (125g)
  • 1 1/2 cup all purpose flour (188g)
  • 1 tsp baking powder
  • 1 tsp baking soda
  • 1/2 tsp salt
  • 2 cups walnut halves (about 150g, not optional see notes)
  • 2 cups large semi-sweet chocolate chips (just dump in one standard 11oz/311g bag of chocolate chips, see notes for which brand I used)

Method

  1. Preheat oven to 400°F/200°C.
  2. In a large mixing bowl, beat together the sugars and the butter until smooth.
  3. Add the eggs and beat until incorporated with the butter and sugars.
  4. Add the cake flour, all purpose flour, baking powder, baking soda, and salt. Gently fold in the ingredients until the dry ingredients are mixed in.
  5. Add the walnuts and chocolate chips into the batter and gently fold in until they are well-distributed throughout the batter.
  6. Divide the dough into 6oz/170g portions, using your hands to shape them into balls (do not flatten).
  7. Bake each cookie for about 15mins (see notes). You most likely will have to bake these cookies in batches (do not crowd the cookies on the baking sheet). The cookies are done when the top and bottom is very golden.
  8. Let cool for about 15 mins before serving.

Notes

  • The walnuts are needed to give the cookies enough bulk to be a big cookie and still have the right texture.
  • I found that the original recipe’s suggested baking time of 11 mins was way too short for my tastes and you could barely pick up the finished product. So adjust to your tastes.
  • If you decide to refrigerate/freeze your dough before baking, make sure to let the dough thaw to room temperature before baking or the inside of the cookie will be too raw.
  • I used these grand semi-sweet chips from Ghirardelli.
  • These cookies freeze well, both before and after baking.

Wild Rice and Cranberry Sourdough

Back to my sourdough roots.

20191005_211502

So it was Sally‘s (my sourdough starter) 4th birthday and I needed to bake something to celebrate it.

wild rice cranberry sourdough

And it was time to celebrate her tenure in Minnesota by incorporating some wild rice. Just adds a little toasty something to the bread.

wild rice cranberry sourdough 2

The molasses and balsamic vinegar in the bread also adds some depth and complexity of flavour, and also complemented the earthiness of the wheat flour used. And the honey and dried cranberries just gives a little sweet contrast to everything.

wild rice cranberry sourdough 3

I adapted the recipe from here.

Ingredients

  • 123g active sourdough starter (mine was an all white starter at 100% hydration)
  • 19g wild rice
  • 220g water
  • 3g instant yeast
  • 250g strong white bread flour
  • 116g whole wheat flour
  • 13g balsamic vinegar
  • 7g molasses
  • 7g honey
  • 8g salt
  • 1 cup (about 113g) dried cranberries

Method

  1. Cook the wild rice – in a small saucepan, cover the wild rice with enough water so that all the wild rice is submerged. Bring to a boil, and then reduce heat to low. Cook the rice, covered, for about 45 mins. Check occasionally to make sure the water hasn’t boiled off (top off with water if this happens). The rice is cooked when some of the kernels have burst open. Drain any excess water and let cool.
  2. In a large mixing bowl, mix together the starter, water, instant yeast, flours, balsamic vinegar, molasses, honey, and salt, until all the flour is hydrated. Cover, and let autolyse (see notes) for 5 mins.
  3. Knead for about 5 mins. Then add the cooked wild rice and dried cranberries into the dough using the pincer and fold method. Shape the dough into a ball, cover, and let rest for 10 mins.
  4. Stretch and fold your dough. Leave for 10 mins.
  5. Stretch and fold your dough two more times, leaving 10 mins before each stretch and fold.
  6. After the last fold, shape the dough into a ball, cover, and place into the fridge to rise overnight.
  7. The next day, remove dough from refrigerator and let warm up at room temperature for about 2 hours.
  8. Shape the dough into a ball and place into a well-floured banneton, seam-side up. Let rise until 1.5 times in size, about 1-2 hours.
  9. Meanwhile, place your dutch oven in the oven and preheat to 260°C.
  10. Once the dough has finished rising, turn the dough out onto a floured surface, seam side down. Take the dutch oven out of the oven. Carefully place the dough into the dutch oven, and score the dough. Cover and return the dutch oven to the oven.
  11. Bake the bread at 260°C for 30 mins with the lid of the dutch oven on.
  12. After 30 mins, take the lid off and reduce the temperature of the oven to 230°C. Bake for an additional 15 mins.
  13. Remove the dutch oven from the oven, and transfer the bread to a cooling rack.
  14. Let the bread cool for at least 1h before cutting.

Notes

  • My starter was at 100% hydration. If you have no idea what I’m talking about check out my previous recipe on classic white sourdough.
  • Autolysing just means letting your flour sit with the water before you add any salt or yeast. This is supposed to make the bread easier to handle and have better structure and taste since the flour absorbs the water or something. More here.
  • Turning and folding means you don’t knead the dough. It’s just an alternative method to build structure in the dough usually used for higher hydration sourdoughs, but it can be used for any bread really. Up to your personal preference.
  • Scoring helps direct the shape your bread will rise when baked. And it looks pretty.
  • If you don’t have a dutch oven, you can try baking it like I used to with a pan filled with water at the bottom of the oven to create steam, for example in this recipe.
  • The rising times listed are a general guide. It’s better to follow the description (eg doubled in size) rather than the timings, as the timing depends on many factors like the activity of the starter, or the surrounding temperature.
  • If you’re using active dry yeast instead of instant yeast, you might have to activate the yeast first. Warm up the water that was supposed to go into the bread till it’s about body temperature, and then add the yeast into the water. When the mixture is foamy (about 5-10 mins later), add the yeast-water back into the bread at the step where the water is supposed to be added.

Mini Pumpkin Cheesecake Tarts

Spoopy spoopy.

20191027_221821

This all started when I watched this video from The Scran Line and I just really liked the aesthetic of skulls crying blood.

20191027_234243 copy

(I flipped that corner tart on purpose to show that ~crisp~ bottom)

But I didn’t want to make an entire cake and wanted the flavours to be a bit more seasonal so I settled on mini pumpkin cheesecake tarts.

spooky skull mini pumpkin cheesecake tart

This is essentially a mini spice-y pie crust with a white chocolate pumpkin cheesecake filling. The tarts are topped with (slightly over-whipped by accident) stabilised whipped cream to add some lightness, and the stabilised cream means you can make this beforehand and the cream will still taste fresh and airy.

spooky skull mini pumpkin cheesecake tart 2

I got the tart recipe from here but added some ~pumpkin spice~ and ground ginger. The filling is from here, and I followed this for the stabilised whipped cream.

The mould for the skulls is from here.

Ingredients (makes about 10 mini tarts)

Crust

  • 2 1/4 cups (10 oz./281g) all-purpose flour
  • 1/2 cup (3.5 oz./100g) granulated sugar
  • 1/2 teaspoon fine grain sea salt
  • 2 tsp pumpkin spice + 1 tsp ground ginger
  • 3/4 cup plus 2 tablespoons (7 oz./200g) unsalted butter, very cold and cut into small pieces
  • 1 egg
  • Ice water, as needed
  • 2 tbsp melted butter (to brush the muffin tin)

Pumpkin cheesecake (will make more than needed for 10 tarts so you could double the crust if you wanted to make 20 tarts instead)

  • 2 cups cream cheese softened (458g)
  • 1/2 cup light brown sugar packed (100g)
  • 4 oz white chocolate melted (113g)
  • 1 tsp pumpkin pie spice
  • 3/4 cup pumpkin puree
  • 2 large eggs room temperature

Stabilised whipped cream

  • 1 cup heavy whipping cream
  • 1 tbsp powdered sugar
  • 1 tsp powdered gelatin (I used Knox)
  • 2 tbsp cold water

White chocolate skulls and bloody tears

  • About 12oz white chocolate (340g)
  • Corn syrup
  • Red food colouring

Method

Crust

  1. Mix together the flour, sugar, salt, and spices.
  2. Using a food processor, pulse the butter with the flour mixture until the mixture looks like corn meal. Transfer mixture to a large bowl.
  3. Mix in the egg.
  4. Add 1 tbsp of ice water at a time until the mixture comes together and forms a big ball.
  5. Flatten the ball into a disc and cover the disc in plastic wrap. Place the disc in the fridge for 30 mins.
  6. Meanwhile, brush the cavities of the muffin tin with melted butter to make sure the dough does not stick to the tin.
  7. Remove the chilled dough and roll to 1/4 inch thickness. Cut out rounds of dough larger than the cavity of the muffin tin, and use your fingers to press the dough flat against the bottom corners of the pan and up the walls of the cavities. If air bubbles form, use a fork to dock the dough and press down to get rid of the air bubbles.
  8. Freeze the dough in the pan for 15 minutes. Meanwhile, preheat the oven to 350°F/180°C.
  9. Remove the pan from the freezer and fit a cupcake liner on top of each crust and fill with pie weights (I used dried beans).
  10. Place in the preheated oven and bake for 30 minutes.
  11. Remove the cupcake liners with the pie weights from each crust and bake for an additional 10 minutes.
  12. Let the pie crust cool for 10 minutes before adding the filling. Meanwhile, lower the temperature of the oven to 325°F/160°C.

Cheesecake filling

  1. While the crust is baking, make the cheesecake filling.
  2. Use a hand mixer or stand mixer to blend the cream cheese, sugar, melted white chocolate, and pumpkin spice together until smooth, 3-4 minutes.
  3. Add the pumpkin puree and mix until combined.
  4. Add each egg one at a time, mixing well between, until the mixture is smooth and evenly blended.
  5. Add the cheesecake mixture into the cooled tart crust.
  6. Bake in the preheated 325°F/160°C oven for 20-25 minutes or until the filling is just set (if you jiggle the pan the middle should still be slightly wobbly but the edges should not jiggle).
  7. Transfer tart pan to a wire rack to cool for about 10 minutes, then remove the tarts from the pan to cool completely to room temperature.

Stabilised whipped cream

  1. While the tarts are cooling, make the stabilised whipped cream. Bloom the gelatin by sprinkling the gelatin over the water and letting it sit for 5 minutes (making sure all the gelatin is hydrated – this is to stop grainy lumps in the whipped cream).
  2. Once the gelatin is bloomed, heat in the microwave for 5 seconds to melt. If not fully melted, microwave in 3s bursts, stirring well in between each bust. Do not overheat.
  3. Add in 1 tsp of cream to the gelatin and mix.
  4. Whip the cream to soft peaks and add in the powdered sugar. Slowly drizzle in the melted gelatin, while whipping the cream. Continue whipping to stiff peaks.
  5. Pipe the whipped cream over the completely cooled tarts. Store the tarts in the fridge until completely chilled before serving.

White chocolate skulls and bloody tears

  1. To make the white chocolate skulls, melt the white chocolate and pour into the moulds. Tap the mould sharply onto the counter to ensure there are no trapped air bubbles. Place in the fridge for about 15 minutes or until the chocolate has set. Remove the mould from the chocolate, and use a paring knife to neaten the edges. You might want to wear gloves for this so the chocolate doesn’t melt in your hands as quickly and you don’t leave fingerprints over the skulls.
  2. To make the tears of blood, just mix corn syrup with red food colouring and pipe into the eye sockets of the white chocolate skull. Pipe the tears of blood right before serving (see notes).

Notes

  • The white chocolate skulls are basically pure solid white chocolate so it can be a bit rich.
  • The stabilised whipped cream can be kept in the fridge for up to 3 days.
  • The tears of blood will thin out and get absorbed by the cream after a couple of hours so only pipe the blood right before you serve.

Japanese Jiggly Cheesecake (revisited)

Back with a vengeance.

20191015_205541

What makes this a Japanese cheesecake is whipping the egg whites before incorporating them into the cheesecake mixture, giving the cheesecake an airy light texture.

jiggly-cheesecake-small-0.6-20

As well as unbelievable bounce, look at that! Take all your videos while the cheesecake is fresh out of the oven because the cheesecake is served chilled and you lose your jiggle after chilling.

japanese jiggly cheesecake

I’ve tried this recipe before, but didn’t have as tall a cake since I used a pretty big cake tin. But now I have a tin of the right height (3″ tall).

I also learnt from my mistakes and did not attempt to decorate the top of the cake since I can’t draw.

This recipe is from ieatishootipost.

Ingredients

Yellow team

  • 250g Philadelphia cream cheese (1 block)
  • 6 egg yolks
  • 70g sugar
  • 60g melted butter
  • 100ml full cream milk
  • 1 tbsp fresh lemon juice
  • 1 tsp lemon zest
  • 60g cake flour
  • 20g cornflour
  • 1/4 tsp salt
  • 2 tsp vanilla extract

White team

  • 6 egg whites
  • 1/4 tsp cream of tartar (optional, for stability of egg whites)
  • 70g sugar

Glaze (optional)

  • About 1 tbsp apricot jam

Method

  1. Butter a light-coloured tin liberally, making sure to butter the rim as well. Lightly coat with cornflour. Alternatively, spray the tin with non-stick spray. Line the bottom of the tin with baking paper.

Yellow team

  1. Boil some water and pour into a saucepan. Place a large heatproof bowl over the saucepan, ensuring the bottom of the bowl isn’t touching the hot water.
  2. Add cream cheese into the bowl and whisk until smooth.
  3. Add the egg yolks and whisk.
  4. Add 70g sugar and whisk.
  5. Heat up the milk and butter slightly (basically until it’s not cold) and whisk it into the batter. Then, add the vanilla, salt, lemon juice, and lemon zest.
  6. Remove the bowl from the saucepan (but don’t throw away the hot water yet). Sift in the cake flour and cornflour and fold in.

White team

  1. Whisk egg whites until foamy.
  2. Add the cream of tartar and whisk until the egg whites look like clouds (bubbles should be very small, but still visible).
  3. Add in the sugar a little at a time until just before soft peaks. Do not overwhip – this may cause your cheesecake to crack.

Assembly

  1. Fold the white team into the yellow team a third at a time. Fold until just incorporated (ie no more white streaks).
  2. Pour the batter into the tin, making sure to leave at least 1.5-2cm for the cake to rise. Tap the tin on the counter to release some air bubbles.
  3. Place a towel in a larger tin and pour in the leftover hot water from the saucepan (basically you want pretty warm water but not boiling hot water or your cheesecake will cook unevenly). Place your tin with the cake in it inside the larger tin, creating a water bath for your cake.
  4. (If using an 8 inch pan) Bake at 200ºC for 18 mins (at the end of this point the top of your cake should be lightly tanned). Then, lower the temperature to 160ºC for 12 mins. Then, turn the oven off for 30 mins. Finally, open the oven door and leave the cake in the hot oven for 10 mins. (see notes for temperature)
  5. Glaze the cake (optional). Heat equal amounts of apricot jam and water, and then sieve it if your jam was chunky. While the cake is still warm, brush the top of the cake with the apricot jam glaze. This is to reduce the wrinkled look of the cake and give the cake a pretty shine.
  6. Refrigerate the cake overnight.

Notes

  • This cake looks best right out of the oven. It might wrinkle a bit after a night in the fridge, so take all your pictures first.
  • This cake tastes best after a night in the fridge. Resist the urge to eat it straight away.
  • It’s important to use a light-coloured tin for this. A dark coloured tin heats up too fast and might cause your cheesecake to crack.
  • ieatishootipost did not recommend using a springform or loose-bottomed tin, as he says the water from the water bath sometimes still got into the cake. If you don’t have any one-piece tins, make sure to cover the bottom of the tin well with aluminium foil to prevent the water from entering the cake. If you are using a one-piece tin, like I did, the cake comes out really easily, don’t worry.
  • The original recipe also claims that for maximum consistency, use Philadelphia brand block cream cheese.
  • The most reliable way to tell what temperature to use is to use an oven thermometer. You basically want the oven to be at 180ºC for the first 18 mins. Then you want to lower the temperature to 160ºC by the time it’s 30 mins after you put the cake in. All the temperatures in the recipe above is to take into account the heat lost from opening the oven door, but the most accurate gauge will be to use an oven thermometer – I basically just baked at 180ºC the first 18 mins since my oven didn’t really lose much heat from opening the door.
  • If you still want to draw a design on the top of the cheesecake, you can go to the original recipe link for instructions.